
December 23, 2003
BMW M3 Engraved Pedals / Dead Pedal DIY Install (for e46 3 series)
By: Daniel Wu
Price: $60 shipped (from eBay, seller sprinter91801)
Ease of install: 2/10
Time Needed: 30 minutes
Tools Needed: 2mm hex driver or key, 7/64" drill bit, 5/32" drill bit (that can go through metal), Phillips-head screwdriver, drill, vacuum cleaner
Please note: We are not responsible for any damages incurred from you installing your product. This page is for information purposes only. If you are not mechanically inclined, pay a shop to do it.
This DIY should apply to other pedal installs as well, but there may be some differences.
I hated the stock look pedals and the ugly space where a dead pedal should be, so I looked around for pedal sets. I considered going with OEM pedals, but I didn't like the look and it seemed to cost a bit more than what I wanted to pay, too. So I checked good ol' eBay and found these, which are nicely engraved with the ///M logo.

[ Stock brake pedals with nice glaring empty spot where dead pedal should be ]

[ Rubber overlay on brake pedal removed ]
I first took off the rubber overlay of the brake pedal. You could install the new M pedal on top of that, but I'm not sure why you would want to. I first test fitted everything, and it seemed like it would fit well. Since space is tight in the foot area, I highly suggest you move your driver's seat as far back as possible to make somre more room for you. I started with the brake pedal. I put the new pedal on the metal and centered it. Then holding, the pedal with one hand, I drilled a hole all the way through the metal with the drill and a 7/64" drill bit. Drill shavings are sharp, and I did manage to cut myself, so be careful out there. I then used the 2mm hex driver to screw it in. After it went through the hole, I put the supplied washer and nut in and tightened it a little bit.

[ Brake pedal with new drilled hole exposed ]
Then, center it again, and drill another hole. Repeat as follows with all 4 holes, then tighten each screw, and move on to the accelerator. For the accelerator and dead pedal, you only need to drill through some plastic. Be sure to tighten with the washer and nuts.
For the dead pedal, it uses Phillips-head screws and fits flush. The top screws are a bit weird to put in, as it's hard to drill the right angle with the drill I had and the space available to maneuver the drill.
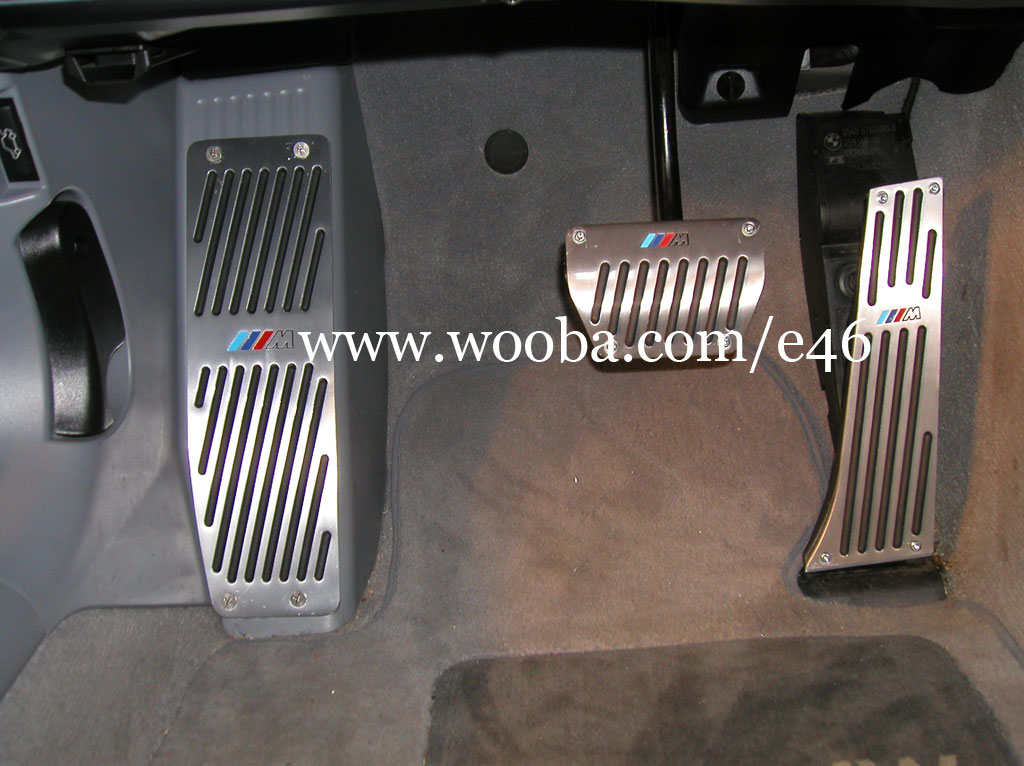
[ Pedals with Dead Pedal installed - Click on it for a larger picture ]
Review: Looks so much sweeter than stock rubber pads and the empty space for the dead pedal. The feel of the pedals is good and non-slip now as well. So this mod is not just for looks. This mod is great! It looks like the M logos are not aligned, but I believe that may be the way it is manufactured, as I don't think you can line it up well while still covering the original spaces. Not really noticeable, especially while sitting in the driver's seat.
Rating: 9/10
Gripes: It would have been nicer if the screws used for the accelerator and brake pedals were flush with the plate as the dead pedal is. Also, hex keys are a pain in the ass to screw in, so Phillips-head screws would have been easier as well. You could always go to a hardware store and get similar sized screws, but it's always nice to have it come with the right stuff.